

In this post, you’ll learn how to get a 90+ score on your Google Core Web Vitals (desktop and mobile) for an ecommerce store even if you use a lot of plugins.
When Google first released their core web vitals assessment, many ecommerce store owners began to panic.
Unlike a basic content site or a blog, an ecommerce store is image heavy and requires many more functional elements to close a sale. And each added feature slows down your site.
For example, live chat can take 6-10 seconds to load by itself. Loading up basic email tracking with Klaviyo can take 1-2 seconds. Even adding the Facebook pixel can take a hundred milliseconds to load.
It doesn’t matter whether your code uses deferred or asynchronous loading. Every additional element on your website will have a negative impact on your core web vitals.
Right now according to Searchmetrics, 96% of sites tested in the US fail Google’s Core Web Vitals Assessment for either desktop, mobile or both.
And the failure rate is even higher for ecommerce stores because of the required functionality to take transactions online.
In this post, I will show you the exact steps that I took to achieve a 90+ Google Core Vitals rating for my 7 figure ecommerce store website.
Get My Free Mini Course On How To Start A Successful Ecommerce Store
If you are interested in starting an ecommerce business, I put together a comprehensive package of resources that will help you launch your own online store from complete scratch. Be sure to grab it before you leave!
What Are Google Core Vitals?
Google Core Web Vitals are a set of factors that Google incorporates into the search rankings to measure the quality of the user experience.
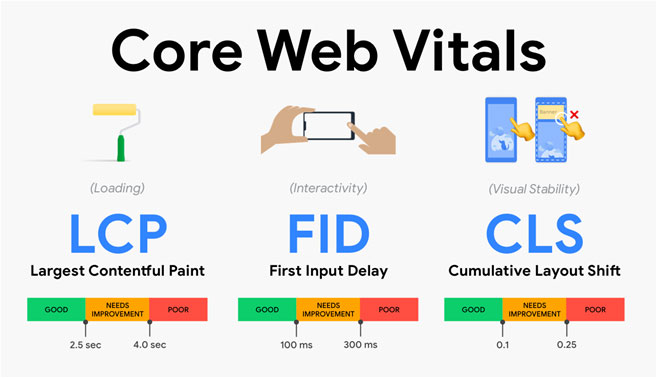
Google Core Vitals consists of 3 components.
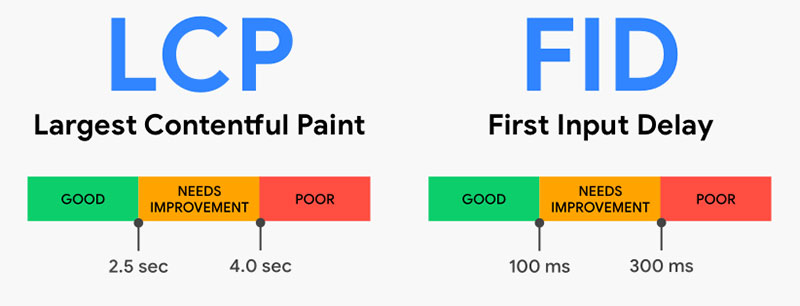
- Largest Contentful Paint (Google requires 2.5 seconds or less) – This is a measurement of how long it takes to see the largest piece of content displayed on your screen. Basically, it’s how fast your site loads.
- First Input Delay (Google requires 100 milliseconds or less) – This is a measurement of your page’s responsiveness and usability. Specifically, Google is measuring the delay between a visitor clicking an interactive feature and how quickly the page responds to that click.
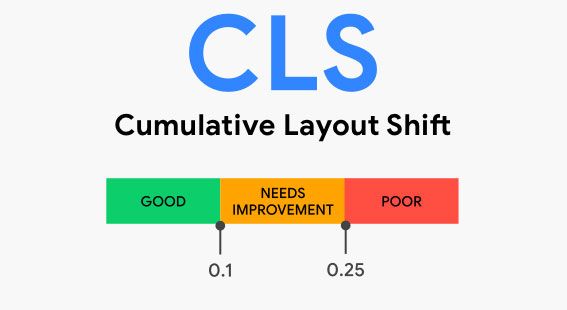
- Cumulative Layout Shift (Google requires a .1 score or less) – This is a measurement of how stable your page is as it loads. Does your content move up and down as the page is rendered? This is the only Google Core Web Vital metric that has nothing to do with page speed. It’s also the hardest one to debug if you don’t know what you’re doing.
The remaining sections of this post will detail EXACTLY how I fixed these 3 metrics for my ecommerce store to achieve a 90+ Google Core Vitals score on both desktop and mobile.
The Ecommerce Store Used For This Case Study

Most ecommerce store owners are on either Shopify, WooCommerce, BigCommerce or Shift4Shop and all of these strategies apply no matter what platform you are on.
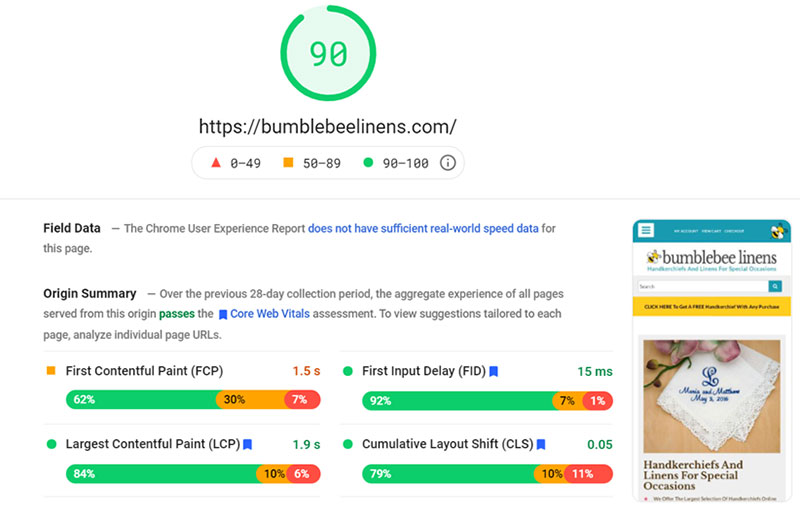
My 7 figure store is located at BumblebeeLinens.com. Feel free to run the Google page speed test on my store as you read this post to see my results first hand.
First off, my store uses many of the latest ecommerce bells and whistles because I teach an ecommerce course over at Profitable Online Store.
In fact, I treat my store like a laboratory to test new features as they come out and report about them on this blog.
Here are the plugins and services that I’m running on my shop for this case study.
- Klaviyo – My email marketing platform
- Postscript – My SMS marketing platform
- Vizury – My push notifications provider
- ManyChat – My Facebook Messenger marketing provider which implements my live chat
- Gorgias – My customer service software that handles all customer correspondence.
- Spin To Win Popup – My primary lead magnet for my shop
- Facebook Pixel – Tracks all of my sales from Facebook
- Google Analytics – Tracks my website sales
- Notify Slide Up – Provides social proof by displaying sales as they come in
Just for fun, this is how fast my site loads WITHOUT any optimizations.

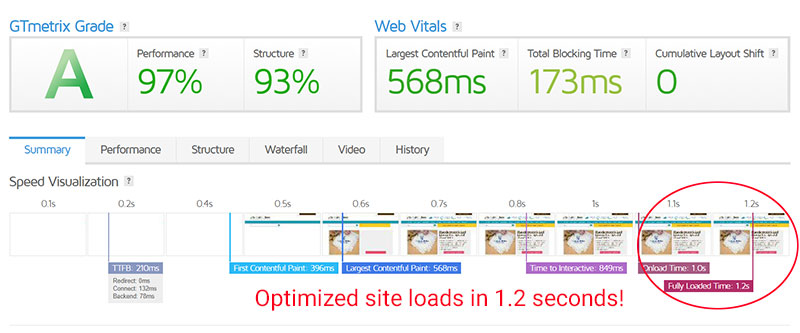
This is how fast it runs with the optimizations I’m about to teach you how to implement.
How To Fix Your Large Contentful Paint (LCP) And First Input Delay (FID) Problems
Low LCP and FID scores are caused by slow page speeds. If you can make your website faster, then both your LCP and FID scores will fix themselves.
For 99% of ecommerce stores out there, LCP and FID problems are caused by…
- Loading JavaScript and CSS That Blocks Rendering – Without any optimization, javascript and css files are sequentially loaded which can block the visual rendering of your page. The best way to speed up your javascript is to lazy load your code or to defer the rendering so it doesn’t block anything.
- Loading Big Photos And/Or Videos – The larger and higher resolution your images are, the longer they will take to load. You should never load a larger image than what is displayed on your website. Also, you should never load any image this isn’t visible on the screen.
- A Slow Server – A slow server should not be a problem with fully hosted platforms like Shopify, BigCommerce or Shift4Shop but if you’re on WooCommerce, then going with a faster host like WPEngine could speed your site up dramatically.
At a high level, if you address the 3 issues mentioned above, then you’ll have a lightning fast website.
How To Achieve 1 Second Page Load Speeds

Below is a complete list of my speed optimizations along with a rating of 1-5 where 5 indicates the highest impact on speed improvement.
In general, you should focus on the 5’s and implement the 1’s and 2’s only if you have time or if you are super anal:)
If you want to know how I achieved a 1 second page load speed, you can jump straight to the big guns with a rating of 5:)!
Enable Browser Caching (Rating 1 out of 5)
Browser caching tells the client browser to cache images and other elements of your website on the user’s local machine to make browsing your website much faster AFTER the initial page load.
Browser caching should ALWAYS be turned on but please note that browser caching will NOT affect your Google Core Web Vitals. Google only cares about how your website is loaded from a completely cold state.
Minimize CSS/JS Files (Rating 1 out of 5)
Minimizing your CSS/JS removes all of the white space from your CSS and javascript files to save a few bytes here and there.
In general, the minification of your CSS/JS files is not going to dramatically improve your page speed.
Perform this optimization if you’re trying to eek out every last millisecond of speed from your site.
Combine HTML, CSS And JS Files (Rating 2 out of 5)
Combining your HTML, CSS and JS files into fewer files can have an effect on your page speed because your server has to fetch less files.
But with the latest web server technology, multiple files can be fetched at the same time in parallel which mitigates this optimization dramatically. I would not spend too much time on this.
Cleanup Your Redirects (Rating 2 out of 5)
Your website is constantly changing and sometimes you might have redirects from certain images and/or pages to others.
For example, when I migrated all of my pages from http:// to https:// many years ago, I issued 301 redirects from certain pages and images to their secure counterparts as a quick fix.
Every redirect on your page will slow down your site so make sure you use a tool like GTMetrix to detect any redirects on your page elements and remove them.
Use A Faster Webhost (Rating 3 out of 5)
If you are on an open source platform like WooCommerce or Magento, your first instinct might be to throw money at a brand new server to fix your page speed issues.
But most of the time, a faster server isn’t going to solve your speed problems. However, if you are currently using cheap shared hosting, a VPS or a dedicated server could make a significant difference.
Use A CDN (Rating 2-3 out of 5)
Content Delivery Networks or CDNs store multiple copies of your website and images on multiple servers all over the world so that your content is delivered by the nearest, geographically located server.
If you have customers worldwide and your site is very image heavy, then using a CDN might have a significant impact on your page speed.
But for smaller sites like mine that mainly serve the United States, using a CDN only has a marginal impact on page speed.
Preload Larger Images And Scripts (Rating 3 out of 5)
Metrics like “largest contentful paint” measure the speed of the largest element on your page. As a result, it makes sense to “preload” the largest elements on your page by providing hints in your HTML code.
Preload hints are instructions in your HTML code that tell a browser which resources are most important for the page.
For example if you have a large splash image, it makes sense to start loading this image first to improve your LCP.
While preloading important elements on your site may help your LCP score, it won’t have an impact on your overall page speed.
Shrink Your Images (Rating 4 out of 5)
Most new ecommerce store owners use image sizes that are much larger than required. If your online store theme uses 1000×1000 images, then you should never upload an image larger than 1000 x 1000.
If your website uses the same image on multiple pages in different sizes, you should create a separate (and smaller) image for each version.
For example, a product image on my store is displayed in full size, 50% size, 33% size and 25% size depending on the page.
As a result, I have 4 different image files (1 for each size) on my site and I only display the smallest image required without loss of quality.
In addition, you should compress all of your JPG files down to a maximum of 50 quality in Photoshop(or whatever image program you use).
Compress And Cache Your Pages (Rating 4 out of 5)
If you are on a fully hosted platform like Shopify, BigCommerce or Shift4Shop, your pages are likely already compressed and fully cached before they are served.
But if you are on an open source platform like WooCommerce, make sure that you use a plugin like WP Rocket.
WP Rocket will pre-render all of your web pages so that your store will serve static pages that require little or no CPU usage.
WP Rocket will also compress your webpage to 90% of its size.
Use Less Plugins That Load External Code (Rating 4 out of 5)
Every plugin that you add to your website will slow it down. As a result, you should be extremely careful whenever you decide to install a new software tool.
Seemingly innocuous features can sometimes dramatically slow down your site!
For example, adding a Facebook share button or a Pinterest pin it button can potentially cause a new piece of javascript code to be downloaded from an external source.
For buttons like Twitter, Facebook or Pinterest, I always use “non javascript” versions that don’t require externally loaded code.
If you want to add a Facebook share button to your site, you should use the hyperlinked version as shown below.
https://www.facebook.com/sharer/sharer.php?m2w&u=https://mywifequitherjob.com/the-best-way-to-find-vendors-for-your-online-store/
Lazy Load Your Images And Javascript Code (Rating 5 out of 5) – The Most Important!
When it comes to improving your page load speed, you should only load elements of your site that are required or visible.
For example, if there’s an image buried 5 scrolls down in your page, you should not display that image until your customer makes it down far enough to see it.
Similarly for javascript code, you should not load any functionality for your website until it actually needs to be loaded.
How To Lazy Load Your Javascript And CSS Code
Lazy loading your images is fairly straightforward and most themes already have image lazy loading built in.
But how can you lazy load the javascript code safely on your site?
Here’s the secret how I do it.
For every page on my site, I load the visual elements of my site first. Then, I only load the functional javascript code on my site once the user takes an action on the page.
For example, if you go to Bumblebee Linens right now, you’ll notice that my website loads super fast (sometimes in under a second).
But if you click on the page or move or scroll the mouse, only then does the live chat load along with the other “shopping” functionality on my shop.
In other words, I’m lazy loading the shopping cart functionality of my site only when the user is taking an action or shopping in my store.
As a result, my page loads super fast because I’m only loading the graphical HTML/CSS elements of my site.
From the user perspective, the shopping experience is perfect because every page loads lightning fast. Meanwhile, Google also sees a fast loading page as well.
How To Implement Javascript Lazy Loading
The first step required to lazy load your javascript is to figure out what can be lazy loaded WITHOUT breaking your site.
Remember, you must load all “essential” code to your site so that your customer’s “visual” shopping experience is not affected.
As a result, you must load every piece of code that affects the rendering of the graphical elements of your site.
Here’s how to figure out what is essential.
Go to GTMetrix and analyze your waterfall chart. Your waterfall chart will tell you everything that is loaded on your page and how long it takes to load.
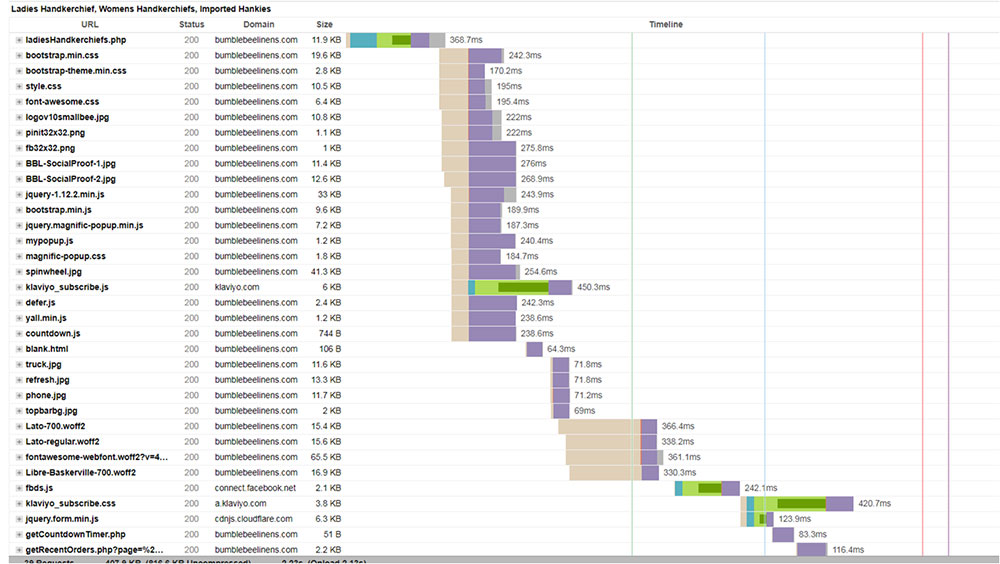
According to the chart above, klaviyo_subscribe.js is taking 450 ms to load. In addition, the klaviyo_subscribe.css is taking another 420ms.
Klaviyo is my email marketing tool and I know for a fact that Klaviyo does NOT affect the rendering of my site at all.
As a result, I can easily lazy load Klaviyo without affecting the visual elements of the page.
In fact, removing the Klaviyo code will shave almost a full second from my page speed!
Using GTMetrix, create a list of all the slow loading code that is not required to render the visual elements of your site and then lazy load the code when ANY of the following events occur.
- Mouse movement
- Page scroll
- Screen touch
Here’s a little code snippet that illustrates my javascript implemention.
 function activity(){
 defer(//Add all of your slow javascript stuff here);
 activityEvents.forEach(function(eventName) {
 document.removeEventListener(eventName, activity, true);
 });
 }
//An array of DOM events that should be interpreted as
//user activity.
var activityEvents = [
'mousedown', 'mousemove', 'keydown', 'scroll',
'touchstart'
];
window.onload = function(){
//add these events to the document.
//register the activity function as the listener parameter.
activityEvents.forEach(function(eventName) {
document.addEventListener(eventName, activity, true);
});
}
Once you implement this one step, you should be able to achieve sub 1 second page load speeds on mobile and desktop!
How To Fix Your Cumulative Layout Shift Problems
90% of your Cumulative Layout Shift problems will be caused by the following 2 reasons.
Loading Elements Without Dimensions
The image size parameters are what allow a web browser to know the size of the content as it loads.
For example, if you define the image dimensions in your HTML code, the browser will reserve space for your image as it loads so the page does not jump.
However if the size parameters are missing, no reservation takes place and the page will have to rearrange itself when the image finally loads.
The simple solution to this problem is to specify the dimensions of every element on your site as shown below.
<img width="400" height="300" class="" src="images/Hankie_HLW-009.jpg" border="0" alt="Wedding Handkerchiefs" title=" Wedding Handkerchiefs ">
Dynamically Adding Content With Javascript
Many Shopify plugins use javascript to dynamically display features on your website. And sometimes this code loads late which can push your page up and down.
For example, if you display ads on your site, your site might jump up and down as the ad loads.
The best way to prevent this from happening is to pre-allocate space on your page for the added content to be displayed.
Adding pre-rendered white space can be problematic for certain plugins so make sure you reach out to the plugin creator if this is an issue with your shop.
How To Solve More Complicated CLS Issues
As mentioned earlier, 90% of your CLS problems can be solved by adding dimensions to your elements. But the remaining 10% can be EXTREMELY difficult to solve without using a specific set of tools.
For my sites, it literally took me 3 weeks to fix my CLS issues because the Google Page Speed test is NOT reflective of the CLS scores measured in the field.
For example, my blog over at MyWifeQuitHerJob.com had perfect CLS scores on the page speed lab test but failed the CLS test in the field.
If you don’t know what I’m talking about, here’s a quick breakdown of Google Page Speed Test.
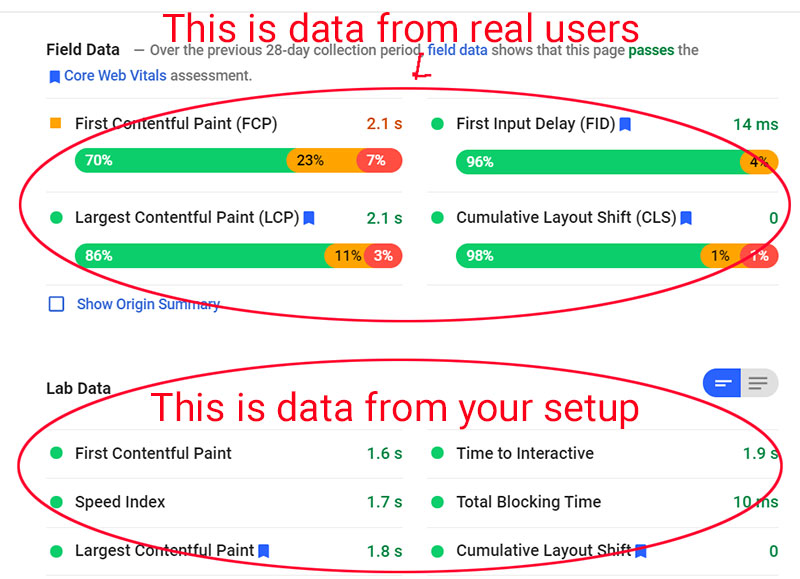
The top score is data gathered from real users using the Chrome browser. The bottom score is the test run under ideal conditions.
When the 2 scores don’t match, it’s a pain to fix because Google does not tell you what’s wrong. In fact, you can have a perfect CLS score in the lab but completely fail CLS in the field.
Here’s what Google does NOT tell you about CLS.
The page speed test only measures your CLS above the fold under ideal conditions. In real life, a user is scrolling up and down on potentially a much slower internet connection.
In order to solve your CLS problems, you MUST emulate a slow connection and behave like a real human user!
How To Emulate A Real User To Fix CLS
The best way to do this is by using the built in Chrome debugger.
Here’s how to debug your CLS problems step by step.
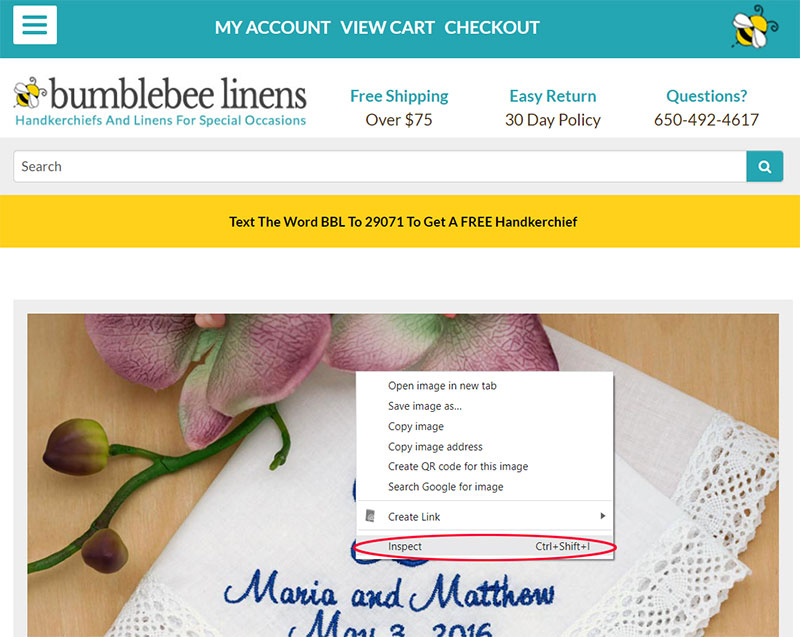
Step 1: Bring up the Chrome Debugger
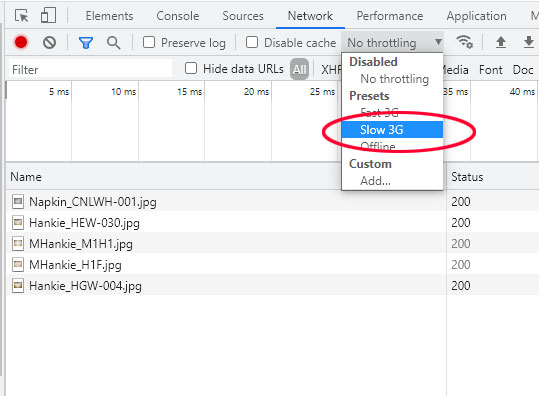
Step 2: Slow Down Your Network Speed
On the “Network” tab, throttle the page speed down to “Slow 3G”. This will slow the page speed load dramatically so you can detect layout shifts easily.
Step 3: Render Layout Shift Regions
Click on the “Performance” tab and then make sure the “Layout Shift Regions” box is checked under “Rendering”.

Step 4: Refresh The Page
Once you have your Chrome Debugger set up, refresh the page and scroll up and down on your page like a real user.
Make sure you look for highlighted areas in blue that indicate a layout shift.
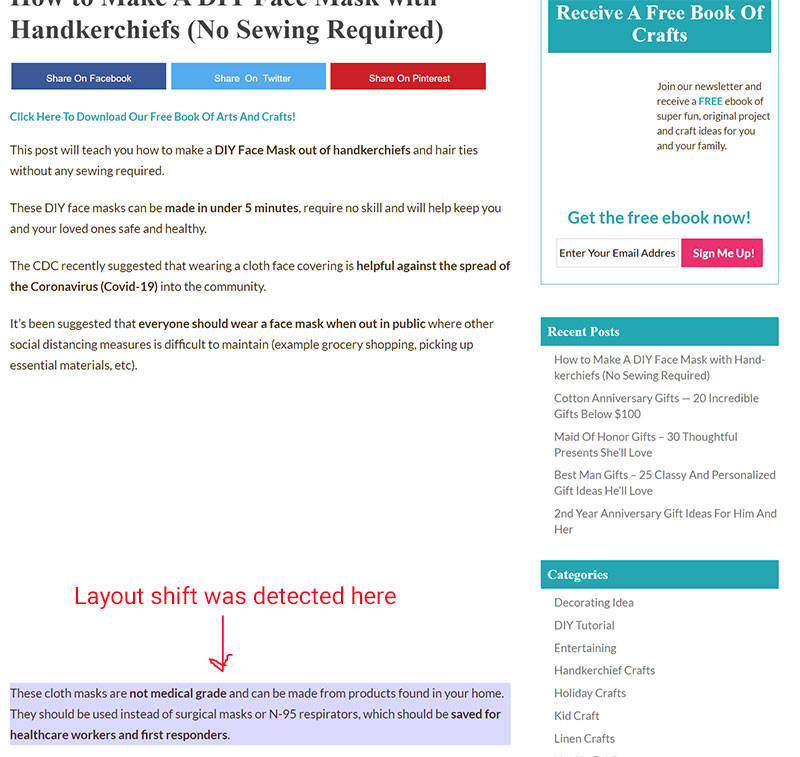
Step 5: Analyze The Performance Timeline
If you see layout shifts on your site on load, then take a closer look by zooming in on your page load timeline.
In the example below, the layout is shifting because I’m loading in a different font that shifts the page down slightly because the new font is larger.

By running these tests on different regions of your page multiple times, you can spot and fix your Cumulative Layout Shift problems easily.
The hardest part is diagnosing where your CLS problems lie because the Google Page Speed test only accounts for the above the fold portion of your page.
You Can Achieve 90+ Core Web Vital Scores For An Ecommerce Store
If you follow all of the directions above, you can achieve sub 1 second page load speeds and achieve a rating of 90+ on your Core Web Vitals for both mobile and desktop.
In general, you should always keep your website as simple as possible and avoid using plugins at all costs!
Ask yourself if you absolutely need a certain feature BEFORE you implement it. Then, seek out solutions that do not require adding additional javascript code to your site.
Because I’m super anal, I actually examine the source code for every plugin I install in addition to the network calls that take place.
Once, I blindly used a plugin that was literally sending my website information to several ad networks and selling my customer info without my knowledge!
Most page speed issues are not caused by your theme but by the plugins you install. Be careful and happy selling!

Ready To Get Serious About Starting An Online Business?
If you are really considering starting your own online business, then you have to check out my free mini course on How To Create A Niche Online Store In 5 Easy Steps.
In this 6 day mini course, I reveal the steps that my wife and I took to earn 100 thousand dollars in the span of just a year. Best of all, it's free and you'll receive weekly ecommerce tips and strategies!
Related Posts In Ecommerce SEO
- Help A Reporter Out | A Guide To Getting Free Press For Your Business
- How To Put Your Website Under Maintenance Without Affecting Your Search Rankings Or Losing Money
- How To Get a 90+ Core Web Vitals Score For An Ecommerce Store (Case Study)
- Shopify Blog – Should I Use WordPress For My Shopify Or BigCommerce Blog?
- Shopify SEO – How To Rank Your Store On The Search Engines

Steve Chou is a highly recognized influencer in the ecommerce space and has taught thousands of students how to effectively sell physical products online over at ProfitableOnlineStore.com.
His blog, MyWifeQuitHerJob.com, has been featured in Forbes, Inc, The New York Times, Entrepreneur and MSNBC.
He's also a contributing author for BigCommerce, Klaviyo, ManyChat, Printful, Privy, CXL, Ecommerce Fuel, GlockApps, Privy, Social Media Examiner, Web Designer Depot, Sumo and other leading business publications.
In addition, he runs a popular ecommerce podcast, My Wife Quit Her Job, which is a top 25 marketing show on all of Apple Podcasts.
To stay up to date with all of the latest ecommerce trends, Steve runs a 7 figure ecommerce store, BumblebeeLinens.com, with his wife and puts on an annual ecommerce conference called The Sellers Summit.
Steve carries both a bachelors and a masters degree in electrical engineering from Stanford University. Despite majoring in electrical engineering, he spent a good portion of his graduate education studying entrepreneurship and the mechanics of running small businesses.


