Shipping charges are one of the most common reasons why customers abandon their shopping carts, so it’s essential that you provide accurate shipping information about your products.
With the shipping attributes, Google Merchant Center covers the insurance costs and specific costs of different shipping carriers, which can be a bit higher than expected, especially if a customer makes a cross-border order.
These shipping attributes are essential for all ecommerce businesses, so it’s important to know how to use them. They’ll help you understand the most important shipping features, such as delivery times and shipping costs, for various locations.
Let’s start by defining the shipping attribute, then move on to the shipping label, weight, height, and length attributes, and wrap things up by covering how to avoid common mistakes when using them.
This article is part of our Google Merchant Center Feed hub.
Table of Contents
Shipping Attribute 1: [shipping]
The first attribute on our list is [shipping]. Merchants use this attribute to provide data about the shipping cost and speed for all their products.
You can use the [shipping] attribute if you haven’t set up the shipping settings through your Google Merchant Center account or in cases when you’d like to edit or update the already existing shipping data.
Usually, merchants use this attribute whenever they want to override the shipping speed and cost settings for fragile or sizable items.
How to Set Up and Optimize [shipping] for Your Products
To set up the [shipping] attribute, follow these steps:
- Create a brand-new shipping service
- Describe the shipping service
- Define and describe the products that you’ll ship with the shipping service
- Draw up the shipping cost and speed
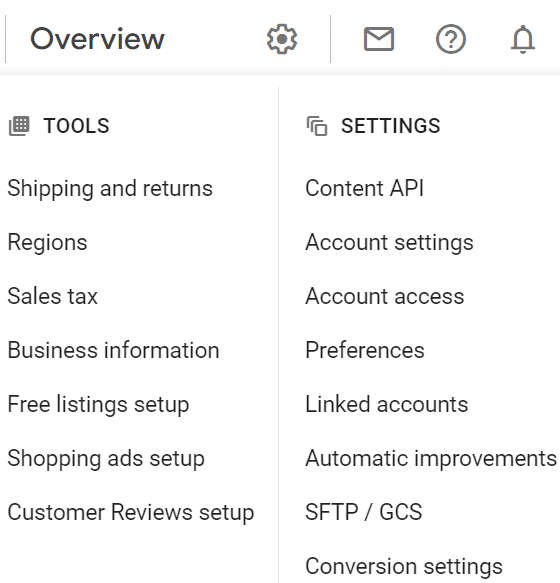
The first thing you need to do is log in to Google Merchant Center. Then, click on “Settings”, and on “Shipping and returns” under “Tools.”
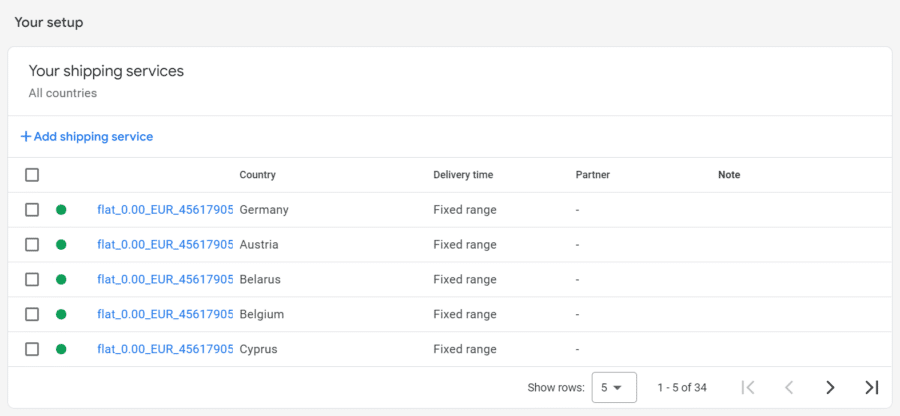
Then, click “Add shipping service.”
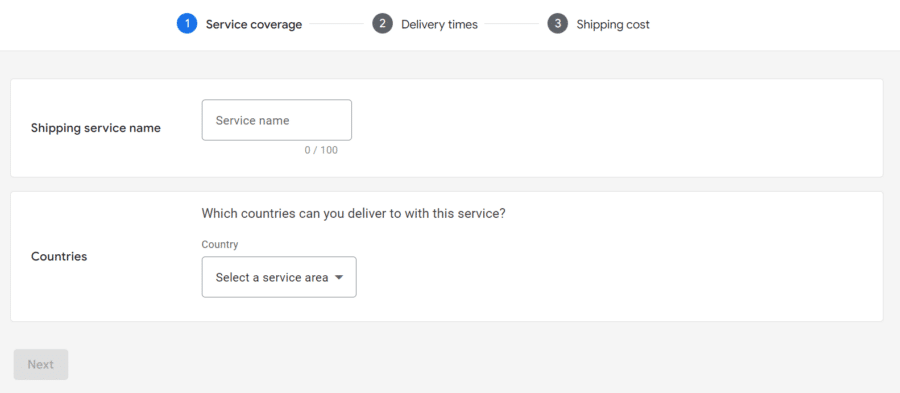
First, you can name the shipping service and select a specific service area where you want to deliver the items. The area where you ship your products or where your company is based may be different from each other.
You can choose multiple countries in one area and choose the currencies that are used in each country.
Then, you can adjust and set a wide range of various delivery times and pick the specific timezone and time when the orders will be processed and placed.
For the option “Order handling time,” you should select the shortest period you’ll need to process your orders, and for the option “Transit time,” you’ll need to add how many days the shipping can take. For example, it can take two to seven days.
If you want to group various items with the same transit time, add the attribute [transit_time_label] to the product group.
You can set up transit times regarding the delivery destinations in the following regions:
- Brazil
- Canada
- France
- Australia
- New Zealand
- Germany
- India
- The United States
- The United Kingdom
You can set up and modify your Google Merchant Center shipping settings by configuring a specific shipping service by logging in to your Google Merchant Center account or through the Shipping Settings API.
You can use your preferred shipping services for all products or a specific product group available on your website, and modify and adjust the settings (delivery time, shipping costs, etc.) for all shipping services.
When you want to send a specific item with various shipping services in one country, Google Merchant Center will calculate the most affordable shipping rates so your customers won’t have high shipping expenses.
In cases where you offer two shipping services – for example, one that offers free shipping for all items over $100 and one that has a calculated rate by the carrier – Google Merchant Center will offer free shipping for the items that cost more than $100.
Best Practices for Using [shipping] to Improve Your Listings
If you implement some of these best practices, you’ll likely see positive results in how your products perform.
Modify the shipping prices according to the currencies of your target countries
When you add the shipping prices, you need to ensure they comply with ISO 4217. Always round up the values and don’t leave all the decimals. If the value is 2.0032 USD, you can submit 2.03 USD.
Add accurate shipping information
When you submit one attribute several times, make sure you add accurate shipping information. If you add conflicting shipping data, Google Merchant Center might disapprove of the shipping settings. Take into account that you shouldn’t submit two different prices for one region.
Write down all the extra charges
Always mention the extra charges your customers will have to pay once they buy something from your website. They shouldn’t necessarily be related to the shipping services – they can also be recycling or debit/credit card fees, service charges, etc. Keep in mind that this information should always be added to the shipping information and should never be added with the price and tax attributes.
Provide shipping costs for all regions you added in GCM
Always provide the shipping costs for all regions you added to your Google Merchant Center account. Merchants who do not provide all the shipping costs in detail risk getting their account or products disapproved by Google Merchant Center.
Shipping Attribute 2: [shipping_label]
The [shipping_label] is a bit different from the [shipping] attribute since it lets you group various products and add unique shipping rates.
By adding it, you’ll be able to label various products under different categories, such as “free shipping”, “small size”, “oversized”, etc.
The data you provide in the [shipping_label] attribute is not public, so your customers won’t have access to it.
How to use [shipping_label] to Provide More Detailed Shipping Information for Your Products
To use the [shipping_label] attribute, you can use Unicode characters and cannot repeat fields. These are the file formats that Google Merchant Center supports:
- Text: Small-sized
- XML feeds: <g:shipping_label>small-sized</g:shipping_label>
Remember that there’s also one obligatory requirement when you use the [shipping_label] attribute:
If your products don’t comply with the requirements, you risk getting your product disapproved. The first requirement is to submit valid Unicode characters. To ensure they’re valid, opt for the encoding called UTF-8 and use compressed formatting when submitting files.
Here are a few examples of invalid or false Unicode characters:
- Control
- Function
- Surrogate pairs
- Private area
- Unassigned code
How to Use [shipping_label] Effectively to Improve Customer Experience
If you want to optimize the shipping label attribute, start by selecting several values, such as minimum order or delivery time for a shipping service that will help you configure all the shipping features in your Google Merchant Center account.
Consider that every time you add several shipping labels for articles shipped to one country, Google Merchant Center will calculate the most affordable rates for your customers.
Also, make sure to use this attribute every time you add a product labeled “oversized” by the carriers. Since the rates for oversized items are not the same as those for regular-sized articles, customers won’t be charged with the automatic rates provided by the shipping carrier.
Don’t forget to add the shipping label attributes for products with a shelf life that must be transported using cold storage.
Shipping Attribute 3: [shipping_weight]
As the name suggests, [shipping_weight] is a Google Merchant Center attribute that you can use whenever you want to add the product’s weight so it can be calculated in the shipping costs. Merchants use this attribute when the shipping carriers calculate rates.
With this attribute, you can add the specific weight of all your products. Keep in mind that you should use [shipping_label] when a product’s weight is above the accepted value.
How to Accurately Measure and Enter Product Weights for [shipping_weight]
When the shipping settings are based on a product’s specific weight, you can add the [shipping_weight] attribute for each article.
There are two methods to calculate the shipping costs by assessing the product’s weight:
- Rates calculated by the carrier
- Weight tables for shipping
When you submit weight data in your Google Merchant Center account, add the number and the unit. These are the four values supported by Google Merchant Center:
- Pound (lb)
- Ounce (oz)
- Gram (g)
- Kilogram (kg)
If you’re using the imperial system of units, you can add up to 2000 lbs; if you’re using the metric system of units, you can add up to 1000 kg. Keep in mind that you can also add decimal points. For example, if your product weighs 2.25 kg, you don’t need to round up the number.
Here’s an example of how the file format should look like.
- Text feed: 4 kg
- XML feed: <g:shipping_weight>4 kg</g:shipping_weight>
The Impact of [shipping_weight] on Shipping Costs and How to Optimize it for Maximum Profitability
The [shipping_weight] attribute can impact your shipping costs mostly because all carriers have their own rules and guidelines on shipping. In some cases, the shipping price can highly depend on the package dimensions but also on the product’s specific weight.
The first thing you can do to optimize this attribute is to set up your shipping carrier services through your Google Merchant Center Account.
Google Merchant Center calculates the shipping costs by taking into account the product’s dimensions and weight. You should never submit the dimensions by using the [shipping_weight] attribute, but by using the following attributes:
- [shipping_length]
- [shipping_width]
- [shipping_height]
Additionally, make sure to take into account the weight limits provided by the shipping carrier. If you don’t respect their rules on limitations, the carrier will not accept your package.
Shipping Attributes 4-6: [shipping_length], [shipping_width], [shipping_height]
Whenever you want to add the specific package dimensions of a particular product, use the [shipping_width], [shipping_height], and [shipping_length] attributes. Once you submit these attributes, you can find the shipping price by the shipping carrier.
How to Accurately Measure and Enter Product Dimensions for [shipping_length], [shipping_width], and [shipping_height]
To accurately measure and enter product dimensions for the shipping length, width, and height attributes, you should follow certain guidelines by Google Merchant Center, like writing down the specific number and then the dimension unit.
Google Merchant Center supports two units:
- Centimeters (cm)
- Inches (inch)
You can add up to 400 centimeters and 150 inches, and you must make sure not to repeat fields.
File formatting for [shipping_length]
Here’s the supported file format for the [shipping_length] attribute:
- Text (TSV): 30 cm
- XML (Feeds): <g:shipping_length>30 cm</g:shipping_length>
File formatting for [shipping_width]
Here’s the supported file format for the [shipping_width] attribute:
- Text (TSV): 30 cm
- XML (Feeds): <g:shipping_width>30 cm</g:shipping_width>
File formatting for [shipping_height]
Here’s the supported file format for the [shipping_height] attribute:
- Text (TSV): 30 cm
- XML (Feeds): <g:shipping_height>30 cm</g:shipping_height>
If you’re interested in formatting your shipping information for API, read the rules on Content API for Shopping provided by Google Support.
Best Practices for Using [shipping_length], [shipping_width], and [shipping_height] to Provide Accurate Shipping Estimates and Improve Customer Experience
To avoid disapproval of your products by Google Merchant Center, follow the requirements and best practices we cover below.
Include all the available shipping attributes
Always include all the available shipping attributes. In cases when you don’t add all necessary attributes, Google Merchant Center won’t be able to calculate the shipping costs correctly.
Use one measurement unit for [shipping_length], [shipping_width], and [shipping_height]
Never use different measurement units for [shipping_length], [shipping_width], and [shipping_height]. If you submit length, width, or height product data in various measurement units, Google Merchant Center won’t correctly calculate the final shipping costs.
Add the dimension attributes
Whenever you’re using the [shipping_weight] attribute, also add the dimension attributes to get a precise shipping rate from your shipping carrier. Some shipping carriers calculate their rates by the product’s dimensions and weight, so add the product’s dimensions whenever possible.
Common Mistakes to Avoid When Using Shipping Attributes
Now that we’ve reviewed all the key features of the shipping attributes, let’s find out more about three common mistakes that merchants sometimes come across.
No shipping costs data for specific products
In cases when you don’t add shipping costs data, Google Merchant Center can disapprove your products until you add them by using the [shipping] attribute. To avoid this, provide the necessary shipping cost data for all of your products.
Google Merchant Center also suggests that merchants should set up and establish general guidelines and settings for their accounts and modify them in cases when specific products do not comply with them. For example, you can use the [shipping_label] attribute in cases when you want to create product groups and categorize them by delivery rates.
The platform lets you specify 100 attributes for a single item, and in cases when your business ships products to various countries, make sure you have shipping expenses for each country in the same currency as your general feed currency.
Incorrect shipping costs
Shipping costs play a crucial role for many customers. It shouldn’t come as a surprise if a potential buyer decides to exit the checkout page without making a purchase after noticing that the costs on your website differ from those on your website’s checkout page.
Luckily, when there is a difference between the shipping costs on your website checkout page and your feed, Google Merchant Center will suspend your account or warn you that there’s an error. In cases when you only get a warning, you’ll get an email from Google Merchant Center that will remind you to modify your shipping rates in a specific timeframe.
Conflicting Shipping Service
Sometimes, a specific product might be missing its shipping fee. This usually happens in cases when you still haven’t specified the shipping fee or you haven’t applied it properly because of inaccuracies with the rules in terms of the destination, price, items, number, etc.
Here’s an example: you’re selling a leather jacket for $250 while your shipping settings only comply with orders that cost from $0 to $200 and $200 to 300. In cases when the buyer’s cart has an item with a higher price than $50 and the leather jacket that costs $250, the total amount will be higher than $300. Then, the shipping settings can’t be put into effect.
The good news is that Google Merchant Center thought of this problem and came up with the perfect solution. To avoid situations like this one, modify your shipping settings, and make sure there’s a service for all sorts of orders based on their destination, price, weight, and product amount.
Final Thoughts
As you can see from this article, all the shipping attributes play an important role in Google Merchant Center since they allow merchants to provide accurate and in-depth shipping information that most customers want to know.
The more shipping information you provide for your customers, the better. Keep in mind that your website visitors are more likely to buy your products if you include shipping data and if you make sure the rates on your website are the same as the ones they’ll see during the checkout process.
Keeping all the shipping information up-to-date is vital, especially if you want to avoid cart abandonment and keep your customers happy. So, next time you add a new product to Google Merchant Center, don’t forget to add all the shipping attributes.