Remarketing is a cost-effective technique that targets an audience who’s already interacted with your website, and therefore it has a higher chance of converting.
Join us as we go over the steps for setting up remarketing audiences for your campaigns so you can re-engage your past visitors and increase your conversion rates.
We’ll first give you a brief overview of how remarketing works in Google Ads, and then focus on practical and actionable advice on how to set up a remarketing audience in Google Ads, step by step. We’ll also share some tips on using these audience segments in Google Ads, so without further ado, let’s get started.
Table of Contents
How Does Remarketing Work in Google Ads?
As we mentioned, remarketing allows you to reach people who’ve already interacted with your website, whether that’s visiting a specific page or abandoning their shopping carts.
Depending on their actions, these visitors are placed on remarketing lists because they agreed to share data about their activity, usually by accepting cookies, while on your site.
The reason why remarketing results in more conversions is simple – the users already expressed interest in what you sell.
But because of some reason, they were not ready to purchase yet. By reminding them of what they missed out on, you give them a second chance to take action. And these ads can also help to build brand awareness.
This all is quite different from the other audience targeting options in Google Ads. Things like detailed demographics, affinity, and in-market audiences are all “cold audiences”. That means they are users that Google lumped together because they share some data points. They might want to buy from you, but whether they’ll do so is a wild guess.
All in all, remarketing audiences help you get the relevant ad to the right people and
enable you to target users in multiple campaigns over some time (maximum of 540 days).
But how exactly are remarketing audiences created? The short answer is tracking codes.
Collecting User Data To Create a Remarketing Audience in Google Ads
Whenever a visitor does something on your website, it triggers the tracking tag to fire.
For example:
- A visit to a product page
- Starting the checkout
- Completing a purchase
For example, users who’ve triggered an event by visiting your website end up on a remarketing list that can be labeled as “website visitors.”
That might be enough if you’re starting. But intuitively you know that not all visitors are equal.
So if you have enough traffic, you might only want to reach people that visited a specific product page but didn’t make a purchase.
Of course, for all this to work, you first need to install a remarketing tag designed to track these events.
Data Sources for Remarketing Audience in Google Ads
Up until this point, we’ve discussed website visitors’ data as a source for creating remarketing audiences.
To gather information on website visitors, there are two methods, Google Ads remarketing tags or Google Analytics tracking code.
They both have their pros and cons. But the biggest reason to choose Google Ads remarketing is that it is relatively straightforward to set up.
But we also have a dedicated article on creating remarketing audiences through Google Analytics if you’re interested in learning more.
Either way, remarketing is well worth it, so in the next section, let’s take a closer look at how to set up a remarketing tag.
How To Set Up a Google Ads Remarketing Tag
Installing the Google Ads Remarketing tag on your site can be a bit overwhelming. So let me start by giving you a high-level perspective.
We need to install an extra tracking code to tell Google which visitor has visited our site, and what actions they’ve performed.
The first one is the global site tag, which is the same across your whole site. And the second is the event snippet, which details the actions a visitor performs on your site.
Now, let’s dive a bit deeper!
Installing the Google Ads Remarketing Tag
Step 1 – Log into your Google Ads account
Step 2 – Go to Tools and Settings > Shared library > Audience manager

The “Audience Manager” is the first item in the second column (Shared Library)
Step 3 – Select “Your data sources” in the left-hand menu:

Next, click on the three dots in the “Google Ads Tag” box.
There, you can go through the initial setup.
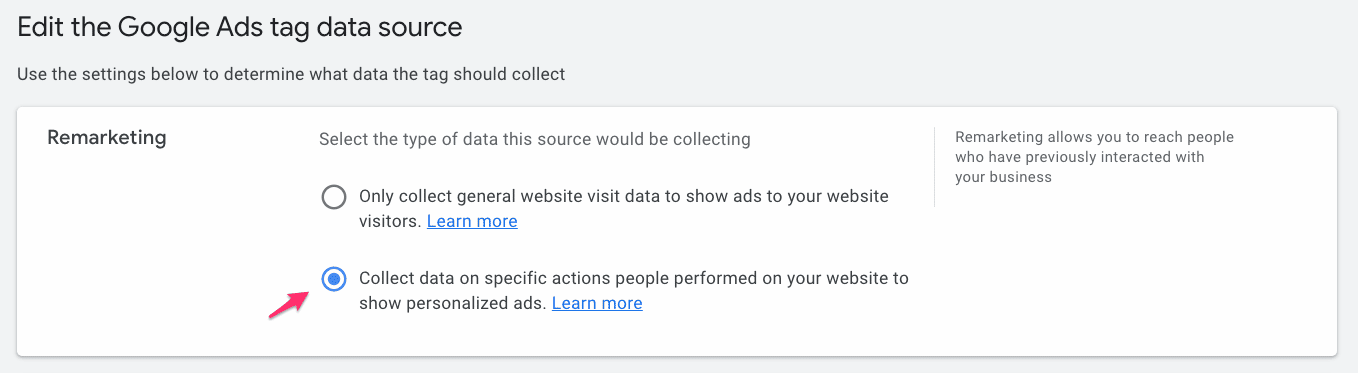
Be sure to select the second option: “Collect data on specific actions people performed on your website to show personalized ads.”
Next, you’ll select your business type:
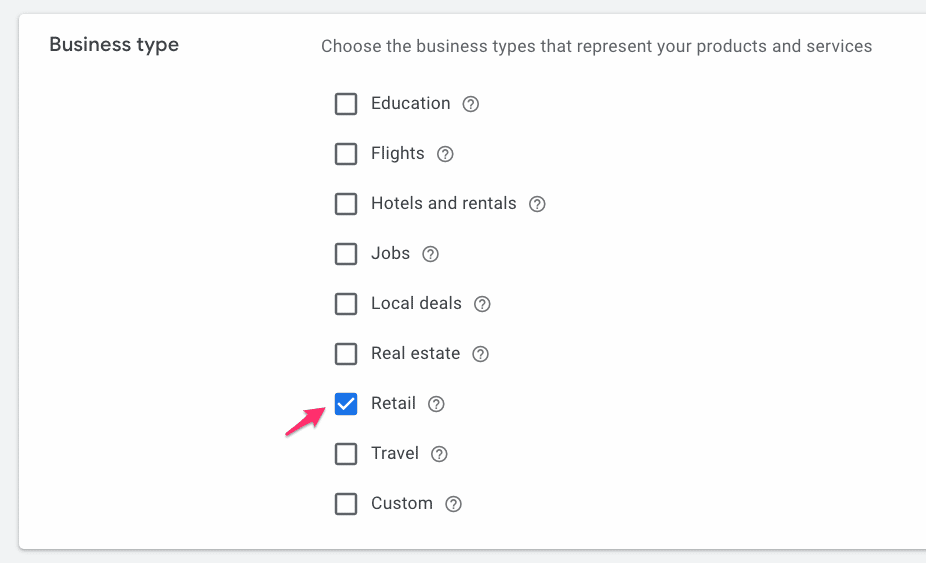
Each business type has its own set of parameters, so if you’re running an online store, be sure to pick Retail to follow along!
Step 4 – Select Google Ads Tag, and at the bottom of the page, you can choose “Tag Setup.” There are three options:
- Install the tag yourself
- Email the tag (to your developer)
- Use Google Tag Manager
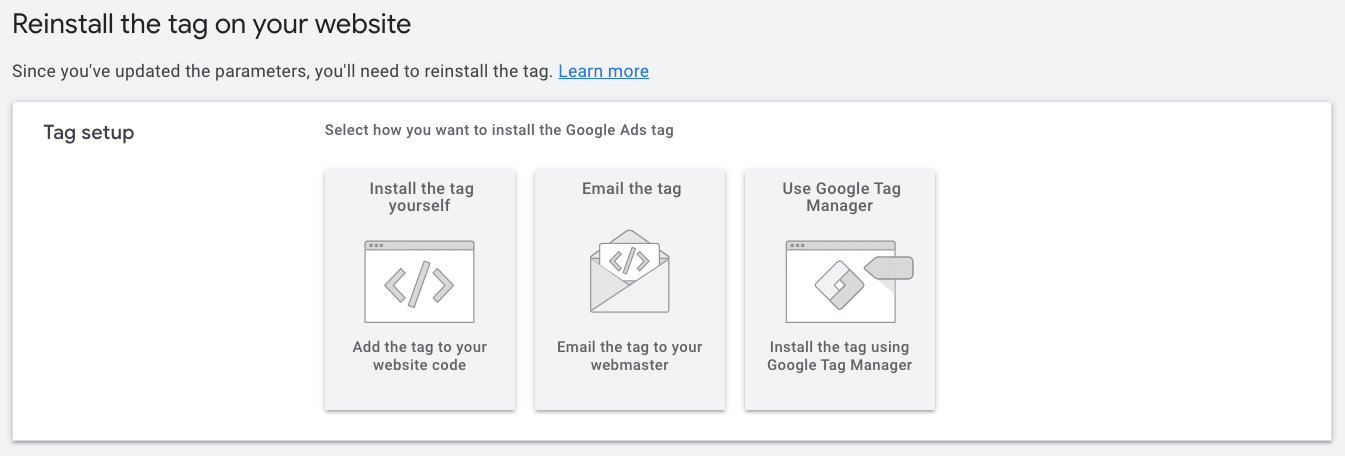
If you have someone more technical at hand, let them worry about the details. But if you don’t, keep reading and we’ll cover the different options for setting up remarketing tags in Google Ads.
Option 1 -Through An App or A Plugin
Some apps or platforms give you the ability to just enter your remarketing ID, and then they take care of all the tagging automatically.
This is probably the easiest way to tag your site but often requires buying a new app or paying a developer to integrate some new code.
Option 2 – Install the tag manually
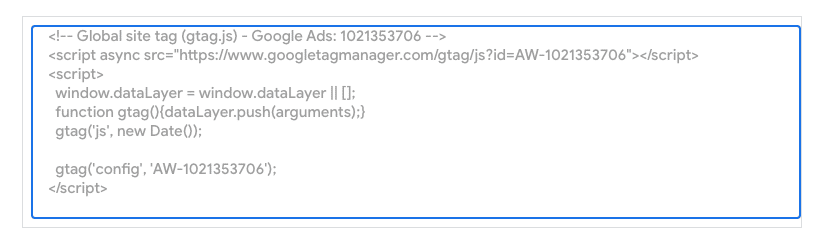
Another way to install the remarketing tag is to install the Google tag (which used to be called the Global site tag) on every page of your site. Usually, this is done by making changes to the templates or code of your site.
The first part of the code looks something like this:
And this is the second part, the Event snippet:
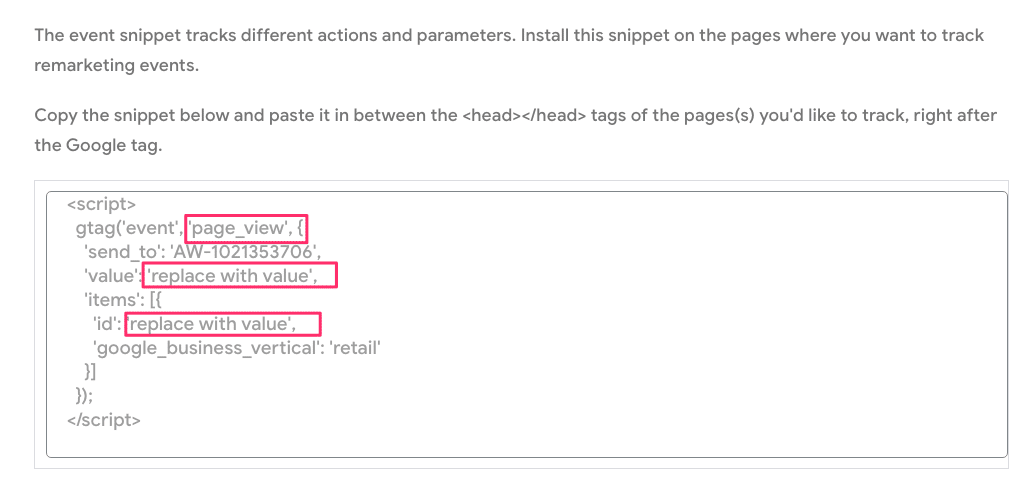
You’ll notice the values highlighted in pink. Those are the parts of the event snippet that need to be dynamically inserted by the ecommerce platform depending on what action a user is doing.
For the retail vertical, there are 3 main parameters that Google expects:
- Event: page_view, view_item, view_search_results, view_item_list, add_to_cart, purchase
- Id: product id
- Value: product price or cart value
It could be that you’re using a previous version of these remarketing tags. They still work the same, the parameters just have a different name:
- Ecomm_pagetype: Page type
- Ecomm_prodid: Product ID
- Ecomm_totalvalue Total product value
As mentioned before, these 3 need to be dynamic values. This means that when it’s working well, your ecommerce platform will automatically put in the correct values like product id or the value.
How you add this dynamic part is different for every ecommerce platform, so I suggest you consult the support docs of your platform to know what variables to add here.
Note: If you’re not very technical, I highly recommend you get a developer involved. For them this is easy stuff, so you don’t want to risk breaking your website design to save a few dollars!
Option 3 – Google Tag Manager
Google Tag Manager is a free tool by Google that you can use to manage all the tags on your site.
So if you’re already using it for other tags, you can set up remarketing as well with Tag Manager.
If you’re not using it, I don’t recommend taking on the additional complexity of learning the Tag Manager interface on top of everything else.
Either way, here is a guide from Measureschool to help you.
Troubleshooting Remarketing Audiences in Google Ads
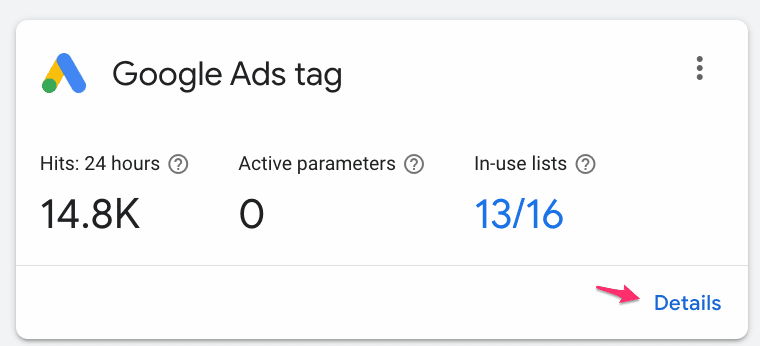
Once you have installed all codes, you can verify if things are working as planned.
In the Your data sources menu, click “Details” in the Google Ads tag box:
In that report, look for the “Data source hits” graph, and add “Match rate” to the graph:
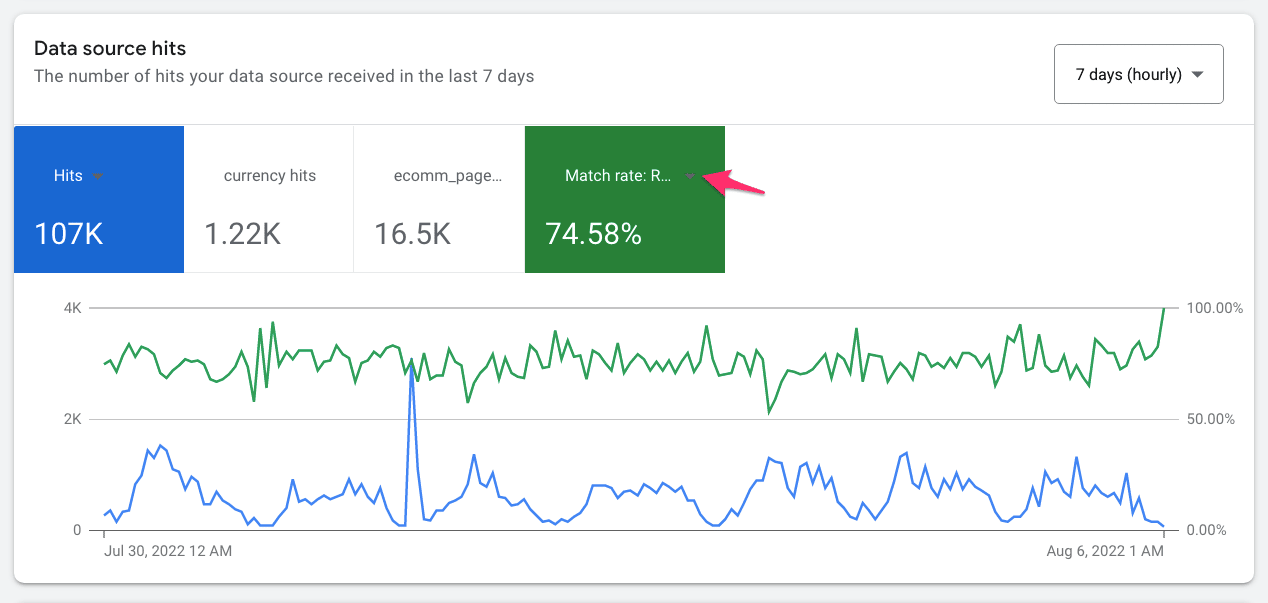
In the screenshot above you see the green line, which represents how many products Google Ads recognizes from website visits.
So 74.58% of the time, Google recognizes the product a visitor is looking at, and they can match it to a product that’s in the feed of the linked Google Merchant Center account.
74% isn’t ideal, so this advertiser should look into why it’s not closer to 100%.
But if your match rate is 0%, this is a problem, because your dynamic remarketing campaign will NOT work as expected.
The most common fix is that the product ids that you’re passing in your event snippet don’t match with the product ids in Google merchant Center!
Note that this “match rate” is a different one from the match rate in Google Customer Match.
Remarketing Audiences in Google Ads
Now that you’ve done the hard work of installing the correct tags, it’s time to use your remarketing audiences!
Automatically Created Audiences
When you’ve configured your remarketing tags, you will see a few automatically created audiences (now called segments) in your Audience Manager.
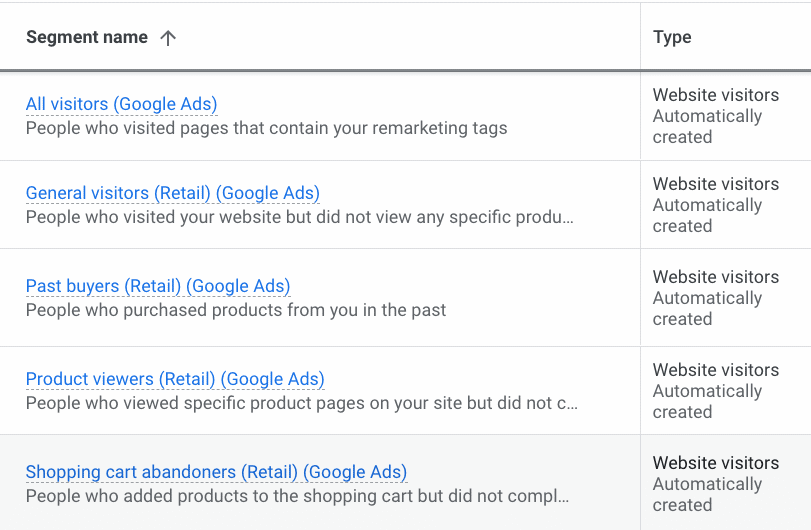
These are:
- All visitors (Google Ads)
- General visitors (Retail) (Google Ads)
- Product viewers (Retail) (Google Ads)
- Shopping cart abandoners (Retail) (Google Ads)
- Past buyers (Retail) (Google Ads)
Google will automatically populate these audiences based on your tags.
After installing, you might need to wait a few days for it to collect the data. But after you see the size of each audience.

In some of the columns, you might see “Too small to serve”.
This audience of Shopping cart abandoners for example contains 530 people, which is too small to retarget on Search, where you need at least 1,000 people to use in an RLSA campaign.
How To Create a Remarketing Audience in Google Ads
While these automatically created segments are a great starting point, there is a lot more you can do if you have the traffic!
To do that, you can create new segments based on your website visitors.
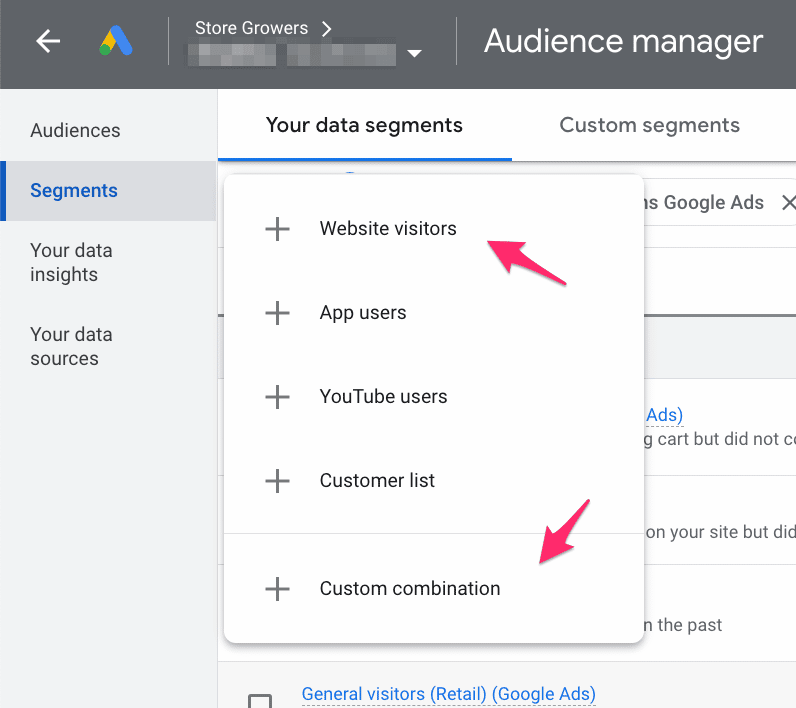
In the Audience Manager, select Audience lists from the menu and click on the + button.
From that dropdown, either pick Website visitors or Custom combination:
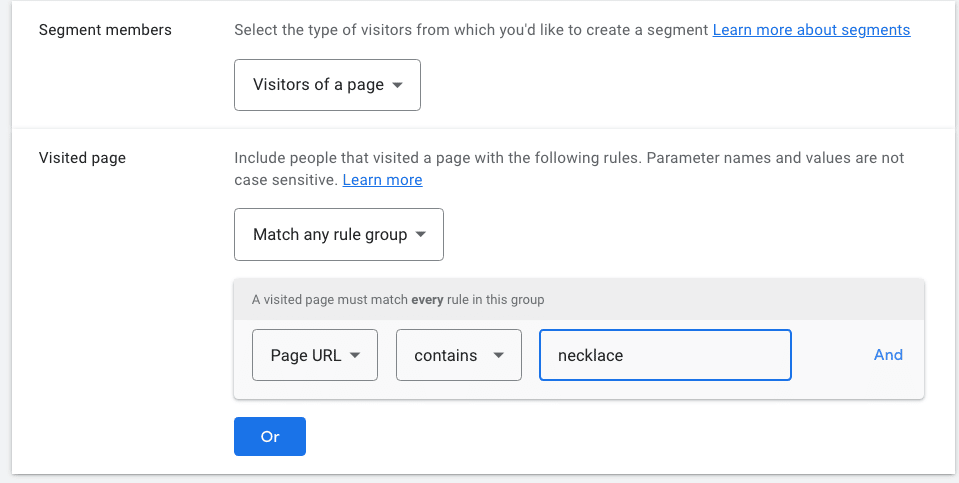
First, you’ll select an Audience segment name.
Next, you select the type of visitors eligible to become segment members:
- Visitors of a page
- Visitors of a page who also visited another page
- Visitors of a page who did not visit another page
- Visitors of a page with specific tags
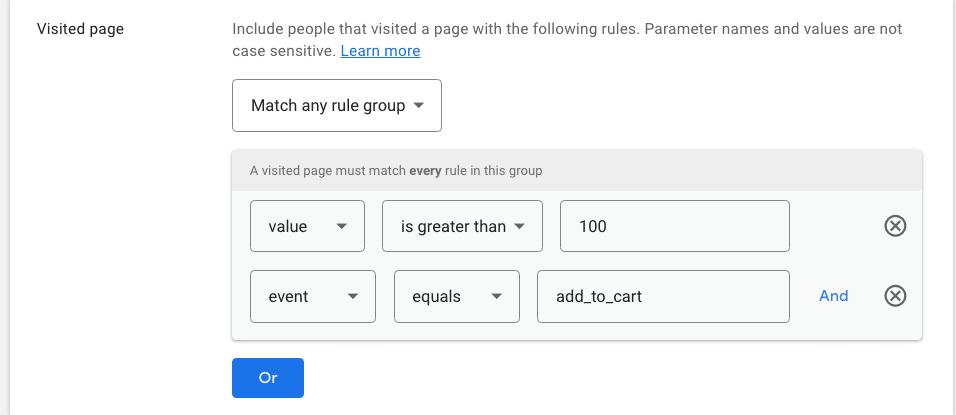
Next, you can set up a bunch of extra rules depending on certain parameters on a visit.
The possibilities here are endless. Here is for example a new audience that groups all people that have added a product valued at more than $100 to their carts:
Whatever combination you make, on the right-hand side you’ll see Google’s estimate of how many people are in your audience:
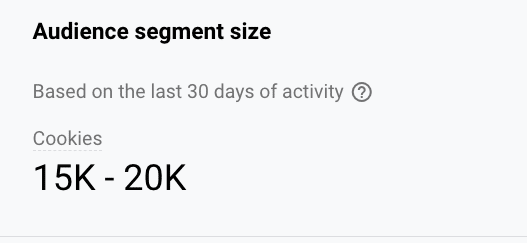
Apart from this, you can also set up membership duration or how long to keep users in your remarketing list after they’ve visited the page (it can be no longer than 540 days). Remarketing segments can be pre-filled with users from the last 30 days, or you can start with an empty segment.
But how do you make the most of your remarketing audiences? Regardless of whether you’re using the automatic ones or ones that you set up yourself.
Let’s delve into it!
How To Use Your Remarketing Audiences
You can play around quite a bit with your remarketing audience segments.
For starters, the actual audience is only one facet of your overall remarketing strategy.
First, there is the type of campaign you’re using the audience in (search, display, video, dynamic, etc.), the approach to segmenting audiences, and campaign optimization. They all play a role in the success of a campaign.
In this section, we will focus on the optimization of remarketing campaigns and share some ideas you can test.
Google Ads Strategies: Dynamic Remarketing
Dynamic remarketing is among the audience targeting strategies recommended by Google Ads.
Standard (non-dynamic) remarketing is the “dumb” version. It doesn’t leverage the detailed information gathered by the tracking code. It only knows whether a visitor has been on a page or not, not what was actually on the page.
Dynamic remarketing takes this up a notch and shows users ads about the exact products they checked on your website.
It also customizes the ad based on the device used and chooses the layout that’s most likely to convert users.
Frequency Capping
While advertisers strive to maximize impression share for targeting cold audience segments, when you target users from your website remarketing list, you might want to be less aggressive.
Remember, these are users who’ve already visited your website and possibly taken action toward completing a purchase. They have an idea about what your product is like.
You can hit them up with a remarketing ad, but you don’t want to be too pushy. This is especially through for Display And Video Ads campaigns.
In Google Ads, there are two options. You can either let Google control the frequency:
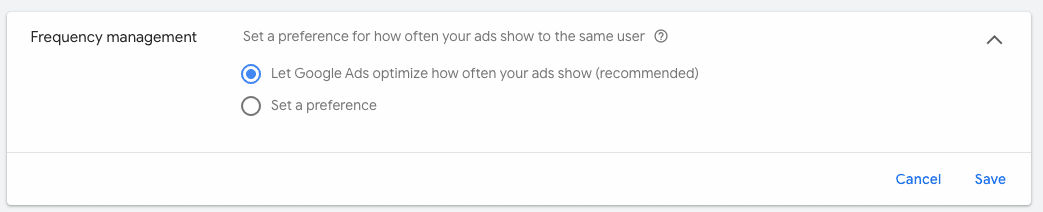
Or define specific parameters yourself based on how often people should see ads from a certain campaign:
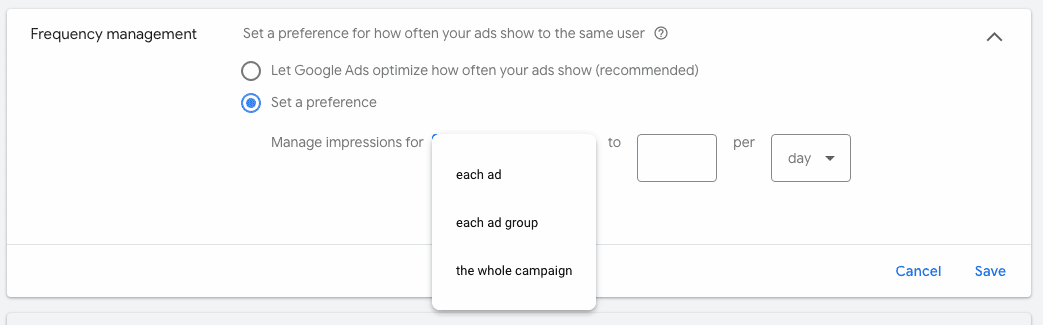
If you’re starting, stick with the default setting to let Google manage it. But if you notice it’s getting too aggressive, you can take it down a notch.
Make Your Audience Targeting Granular and Specific
As with anything related to Google Ads campaigns, you must be ready to play around with the options. Thankfully, there are a lot of options when it comes to optimizing remarketing campaigns.
Here are some other things you can combine with your remarketing audiences:
- Time since their last visit
- Demographic targeting
- Geographic targeting
- Time spent on site
- Product page visits
- Visits to milestones in your checkout process
- Total number of visited pages
The best way to check what works is to test different optimizations and analyze the feedback.
Make Your Privacy Policy Readily Available
In the early days of remarketing, customer privacy wasn’t a big issue. This has quickly changed, and you have to adapt to laws and regulations if you want to have a successful campaign (especially if you are active in the State of California or the European Union).
At the moment, marketers can use customer data that was shared in a first-party context, i.e. directly by the customer once they’ve given consent to your privacy policy. Even the label for these campaigns has changed under pressure from governments and is often described as “your data” (as opposed to remarketing data).
Adding Remarketing Audiences to Campaigns or Ad Groups
When you’re adding a remarketing audience to a campaign, you have the options to add it at the campaign or ad group level.
For Search and Shopping campaigns, it often makes sense to add these on the campaign level (try to be consistent with other audience segments as well!).
But for Display and YouTube Ads, you’ll add them to specific ad groups, as this is the targeting driving your ads.
You can choose to add multiple audiences to the same ad group, or only add one. The main reason why you want to opt for either option is that the max CPC bid is set on the ad group level.
Double Down on Your Investment in Remarketing Lists
The users who end up in your remarketing lists already know a thing or two about you.
So it’s interesting paying special attention to them with your campaigns.
How do you do this?
It’s easy to set up a remarketing audience, as most of the steps in the process are intuitive. You can use many data sources (particularly Google Ads and Google Analytics) to get an automatic remarketing audience. Also, you can create one manually, as long as you play with the rules for including segment members in your remarketing lists.
Optimize the campaign to make it more effective. You can target users based on visits to specific pages of your website. But you can also go a step further and activate dynamic remarketing to show the most relevant ad to the user. If you combine this with tactful frequency capping and granular audience targeting adapted to your industry – you are bound to see results from advertising to remarketing audience segments.
The rest is up to performing test campaigns and adjusting your settings based on the feedback.

Thank you for this! For the “Match rate: retail” section, assuming everything was implemented correctly, will a match rate value show only if there are active dynamic remarketing campaigns or will a value show regardless the campaign types? And if there are no campaigns set up yet but the tags are installed to begin and at the moment only organic + direct users are clicking on items will there still be a match rate value displaying here?
Hi Andrew,
The match rate only applies to whether Google can find the product id that’s on that page with what’s in the product feed.
This is independent of whatever campaigns you have set up. So the organic and direct traffic you mention will show a match rate (as long as things are se tup correctly).