
Are you stuck with the question that how to do email automation and is thinking about from where to begin? As email automation runs the personalized messages at flexibility, with it also needs some pre-work and planning to attain positive outcomes.
One can also attain multiple advantages with email automation, no matter if you are just getting started with it. Be your email list as big as possible and how much time and resources you invest to email marketing, you will be able to visualize the changes in your sending with the uncomplicated automation flows.

Now, let’s start with the article!
Here, we will talk about how to use SendGrid emails automation. Now, automation lets you to send a recurring mail to the contacts on its own at a measure you have decided. Once you have designed an automation, you can make them ready to send automatically by including new recipients to a chosen list or segment which will save you a lot of time.
Also Read: 10 Mailchimp Tips To Improve Email Marketing Performance
1. Make an Automation
Once you are done with the other necessary requirements, you are completely ready to begin with the creation of your first automation. You can begin with the pre-built welcome series and create it on your own or can begin from the very starting by choosing the custom automation.
Also Read: How SEMRUSH Can Help Your Ecommerce Website To Monetization?
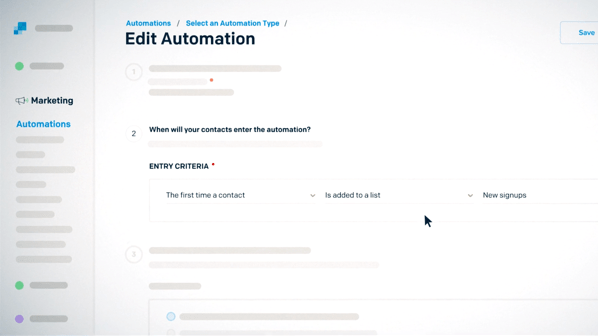
Now, to create a custom automation, what you are required to do is:
- Go to automations and then click on create an SendGrid automation.
- Then under custom, you have to click on select.
- Provide the series with a name and this will just be for your reference and not your contacts.
- Then, choose the entry criteria. You can select from “the very first time a contact is included to your list” or “the first time a contact is included to a segment.”
- You can choose an exit criteria for this series. You can select from the contacts that has received all emails in the automation or the contacts that no longer meets the entry criteria or the contact that meets the required criteria.
- Then choose an unsubscribe group. This group will be applied to all the emails present in your automation.
- Choose the sending time for the foremost email. You can select to send the first email at the moment or you can set a timer for the email.
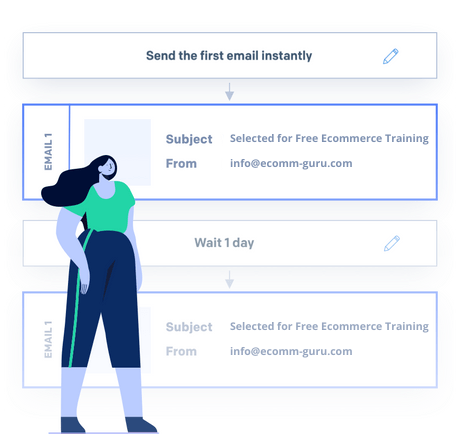
- Create your email by clicking upon Add Email Content.
- Select a template then utilize a preferred editor for crafting the content.
- If you wish to add an email, you can click upon add an email.
- Select how long to wait before sending the next email. This time will be connected with the previous email.
- Once you have designed all of your emails for the automation, select set live.
Also Read: How To Use Google Keyword Planner For Your Ecommerce Website?
2. Utilize the Pre-built Welcome Series
The pre-built welcome series automation will offer a jumping point will influence for creating your own customized welcome series.
To make a Welcome series:
- Go to automations and then click on create an automation.
- Then under welcome, click on select
- You will have to update your name for your reference which will not be visible to others.
- Then take a look at the entry criteria to identify if you would wish to update it. The usual entry criteria is “the first time a contact is included to all contacts”
- Take a look upon the exit criteria to identify that whether you would like to update it or not.
- Then choose an unsubscribe group. This group will be applied to all the emails present in your automation.
- The pre-built welcome series consists of 3 placeholder emails as default. You will be required to edit the subject line and then the content of every email. You will have to decide whether you wish to eliminate or include emails to the pre-built series.
- If you have not done the same with the editor then you can include a subject line and choose a sender from the edit automation page.
- If you wish to add an email, you can click upon add an email.
- Select how long to wait before sending the next email. This time will be connected with the previous email.
- Once you have designed all of your emails for the automation, select set live.
Also Read: 50 Best Amazon Dropshipping Products To Start Shopify Store in 2022
3. Managing Automations
Duplicate an Automation: for duplicating an automation:
- Go to automations
- Look for the automation you wish to duplicate
- Choose the action menu which is present at the right of the automation
- Select duplicate
- After creating the duplicate, the automation will be visible to the edit page. Now you can transform one or the complete settings in the automation.
Book your free ecommerce training
Editing an automation:
In this, the subject line, sender and the content can be edited for any email in the automation.
For editing an automation:
- Go to automations and choose the series that needs to be edited.
- Choose the option edit on every email that you would to like to make changes in.
- Make the required changes in the editor and then click upon save.
- Select the arrow present in the corner of the upper left side.
- Under the email that has been edited. An alert will be seen that states the changes have not been applied yet upon the live automation and when you will be ready for them to be applied, select the option save and apply.
Disabling an automation: for disabling an automation:
If you wish to disable an automation, all the emails in the automation will stop sending on its own until and unless it is set live once again. Zero new contacts will be added in the automation while it is disabled. If the automation will be set live again, the contacts who were present in the automation list before getting disabled will continue to receive emails exactly as they were left off.
- Go to automations and choose the series you wish to pause or stop
- Choose the action menu that is present to the right of the automation
- Choose the option of disable automation in the corner of the upper right hand side.
If you wish to set the disabled automation live again:
- Go to automations and choose the series that you wish to re-enable
- Choose the action menu that is available in the right of the automation
- Select the option of set live present in the upper right corner
Final Thoughts
It is an obvious fact that after setting the automation live, one will be very eager to see the performance of it. With the assistance of SendGrid automation, you will be able to enjoy the live measurement that will portray you the average performance of the automation and with it the statistics for every email present in the series.
Recommended Reads: